Videos Page
Videos page is one of the most used pages in your app. See how and why
Videos Page
The Videos page is one of the most used pages within your app. To quickly describe it, it is a page where you can see all of your videos as well as the details associated with them.
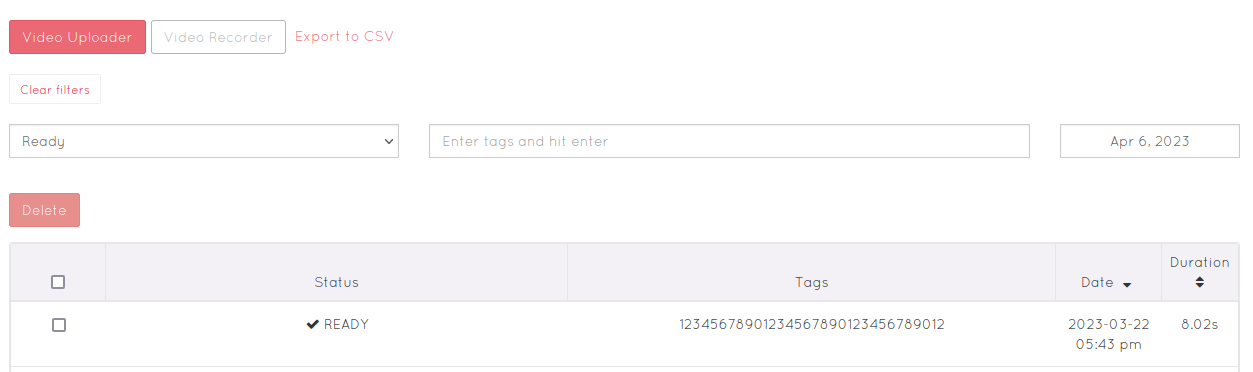
As soon as you open the page you will see 2 upload options.
Video Uploader will provide you with a form that you can fill out and upload your videos. It is limited in size that it accepts, so it is suitable for smaller videos where single file you will upload is up to 2GB in size.
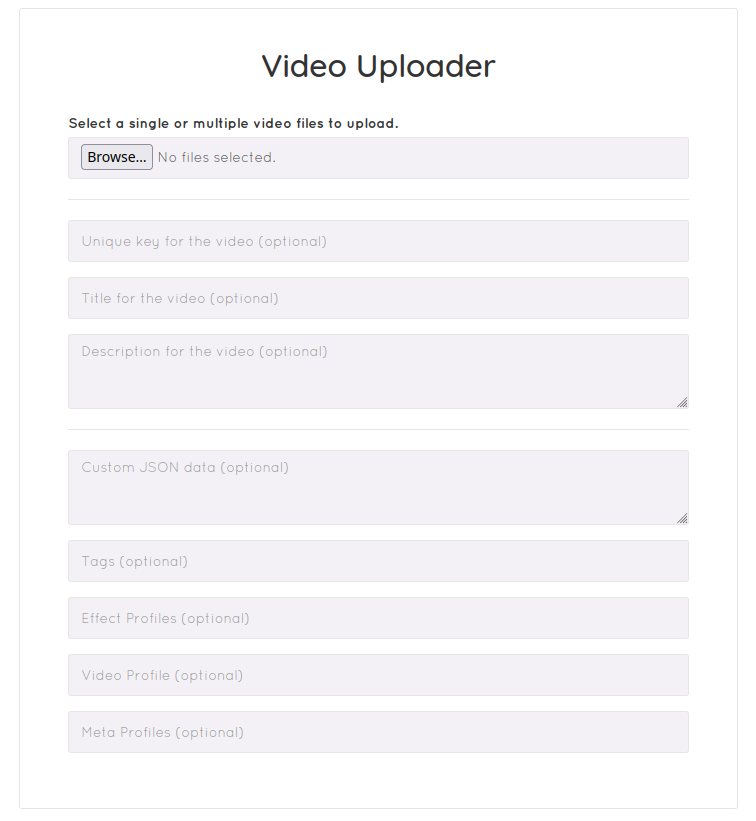
This form will allow you to add the title, description, custom JSON data and tags to your video.
Next to this, if you wanted to apply some profile such as effect profile, the video profile or the effect profile, the fields it offers would allow you to do just that.
Once set, you can simply start the upload of the video to your app.
The other option "Video Recorder" is using the latest version of our recorder to allow you to quickly add video to your application. This option is great way to upload videos if they are very large (10GB or sized in TB) as it has a very large upload limit of 5TB per single file, just like the recorder you would add to your website.
Unlike other page with a form, it does not allow you to add the title or any other parameters, so the video is uploaded with default values.
Right next to this is option that would allow you to export the data about videos shown in the Videos page to your device as a CSV file. You can then open this file in Excel or Libre Calc and view.
Searching for and filtering Videos
By default the page will show with the list of videos that have "Ready" status. These are videos that have been transcoded and are available for playback on your website.
Next to this list, there are few more options that you can choose from. This is the list of all statuses your videos can be found in:
- Empty
- Processing
- Ready
- Failed
- Deleted
The videos marked as Empty are those where the data has not yet been uploaded to, it was partially uploaded or a lot of data was sent to our servers however it was never finalized.
This is basically a reserved place for your video data to come in. These reserved spaces are created as soon as someone starts clicking on recorder even before they actually send their video.
Those videos that are marked as Processing are all that are being processed by our transcoding engine. It is designed to process videos in several stages depending on the video itself (more on this bellow under failed status). Because of these different stages some videos can stay in processing very small amount of time, while others might stay longer.
Ready status is the most common status which indicates that the video is available for playback, to be pushed to some push service, or for any other purpose.
The videos go into this stage once the default stream is processed, so at times you might see it as ready while the additional streams that you might use are still being processed, allowing anyone watching the player on your website to see the video as soon as possible.
Videos with Failed status are not that common, however they can happen. This can happen when someone uploads a non video file to our servers or corrupt video file. There are also specialty codecs that might be present in the video that require specific transcoding to be made available.
For example some video cameras might have a built in codec that is great for what they do, however not common or set with a profile that requires different approach to transcode them. We are on a look out for such scenarios and then add new transcoding approach to handle that.
Because the video is marked with failed, it will pass through several stages of transcoding where we attempt to fix the video or transcode it in a different manner. It is only once everything fails that we mark it as failed.
The videos with Deleted status are available only at some times. You will not be shown the videos unless the "Video Deletion Prevention" is turned on (set to any number of days other than 0).
As soon as you change the status in the dropdown menu our system will automatically retrieve the videos matching the same status and showcase them for you on the page.
Now next to this status dropdown menu, you can also filter the videos to find those matching some tag, or to find specific videos. This match must be exact tag match or exact key or token match.
Finally at the end, you will have the option to filter the videos per the data of when they were submitted.
Video Preview
When you click on the row to see some video you will be immediately shown the preview of the same. This allows you to see and play the video right from your dashboard.
It also allows you to see some additional options that are available for you to use.
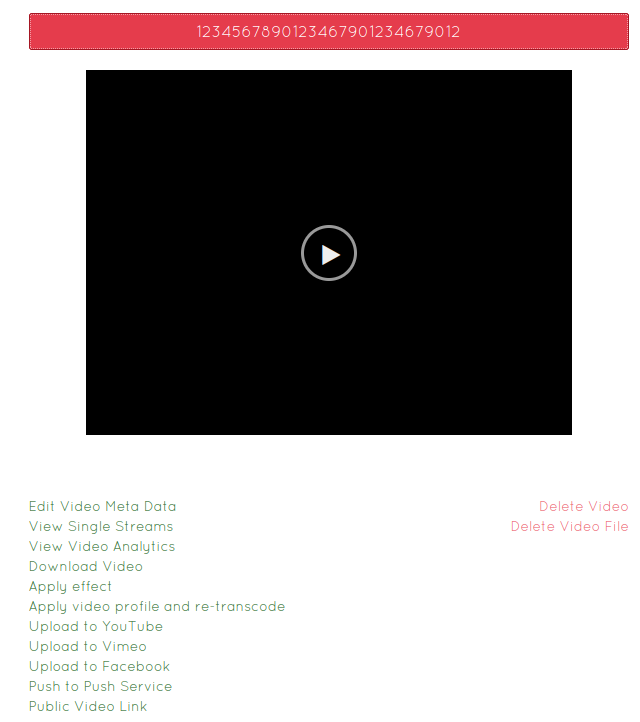
Edit Video Meta Data option allows you to add the title, description, tags and custom data to your video. It is a great way to update some video that you might have uploaded without setting this info.
View Single Streams is probably the most useful one of all as it makes it possible for you to see all streams of that single video. In our system, we actually have 1 original stream and then depending on your setup, there might be quite a few other video streams created. (As a note, our pricing only sees and charges for storage of original stream).
If the original stream is working for you, however some other stream is not, at the top of this page there is an option that says "Re-Transcode" that will recreate the streams and allow you to fix this.
We have made this option shown to you so that you can quickly do it yourself for any video that might seem broken.
View Video Analytics might be available to you depending on your plan, and it allows you to see the analytics data for a specific video.
Download Video is great if you need to download one of the videos in your dashboard and save it to your device. It will start the download of the default stream.
Apply Effect is a way for you to apply some effect profile after the video was created. This is great if your logo changes for example and you want to make it available in your original videos. Once you do, a new stream will be created (or streams) that have this new logo.
Apply video profiler and re-transcode is similar to the above. It is great if you have a video profile to help you get the resolutions of interest. Then as you apply the profile, new streams will be created based on this video profile.
Upload to YouTube, Upload to Vimeo, Upload to Facebook and Push to Push Service will allow you to push the video you have selected to the platform of your choice.
Public Video Link is a link to the video you can share on public. It looks like so:
https://ziggeo.io/v/{video_token}
If you see "Ziggeo Pages" - "Could not access video." it means that you did not allow the public link to be available for your application.
You can enabled them by following the steps here: Ziggeo Hosted Pages under the section "Enable single video hosted page".
The last two options you have on this page are dangerous as they will permanently remove the video from your account. There are 2 ways to do this:
Delete Video- Removes video and data associated with itDelete Video File- Removes the video file, reducing your storage cost, while keeping the video data in our system
The later of the two is great way to allow you to remove some video for any reason you might need to do that, while still allowing the API to be used for searching for that video.
Video Embed codes
Under the preview and options we have described above, there are few simple embedding codes that you can copy and use on your website.
These are very simple codes designed to provide you with code you can just copy paste, however if you want to modify it, you can by utilizing any of the parameters available.
You can also play around with most of the options through our sandbox which would allow you to afterward get the codes for the same.