How to create Auth Tokens
Have you ever wanted to put a lock to your digital assets? Maybe create a key for authorized access only? Are you looking to get some certification or compliance such as HIPAA? Want to tighten up security and privacy of your assets as much as possible? Ziggeo's own state-of-the-art auth token system is actually the answer to all your questions above!
In today's world, on one hand people love to record and express themselves via videos. They love to share or use them to reach out to customers or their near and dear ones. Due to this more and more businesses are finding applications and use for videos. On the other hand, there are people because of which you want to add another layer of security on top of your existing product.
What if we say that with Ziggeo's Authorization token system in place, it is impossible for unauthorized people to even play your video? They will not be able to download nor delete it. Not only this, the Auth tokens can help you to:
- Give video access to certain individuals
- Give access only to certain videos
- Access can be configured in terms of re-recording, recording, playback and deletion
Sounds interesting…Tell me more!
We have 2 types of auth tokens. Server side and client side auth tokens.
The difference between the two is that you are able to create auth tokens by reaching out to our servers and without reaching to our servers.
The benefit of reaching to our servers is that you get a token that is very similar to our video tokens. If you create them on your side, then when the request is sent to us, it has to include a longer string that is your client side token.
While the client side token is longer as it includes all the details we need to know what you wanted to do, there is no additional communication with our servers. For on-fly setup of auth tokens, this might be preferred.
Now once you have the token, the cryptographic token is then passed on to the embedding (recorder or the player). Finally embedding passes the token(s) on to our servers for verification. If the auth token does not pass our server verification, then all access to the asset is immediately blocked.
Which one you choose, depends on your specific setup. So we will dive in for each. Before we do, let's quickly see what are the steps.
How to set things up?
- Activating the Auth system from Ziggeo dashboard.
This can be done under the respective application >> Manage >> Authorization Settings. You can set up what all actions you want to restrict, for example, creating the videos, reading/playing the videos, updating the videos and deleting the videos.
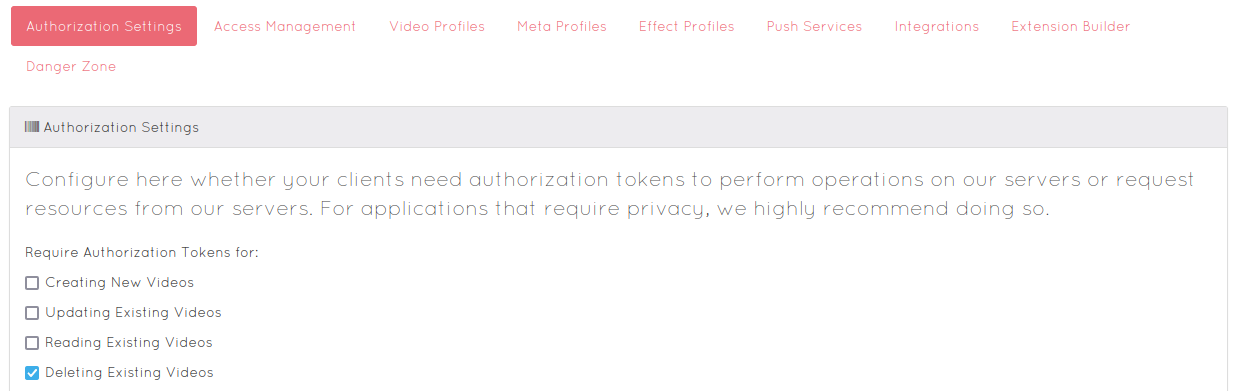
After this is done no one will be able to do actions you selected without having an authorization token.
- Creating Auth Tokens.
We will be covering how exactly this works under Server Auth tokens section and Client Side Auth Tokens sections.
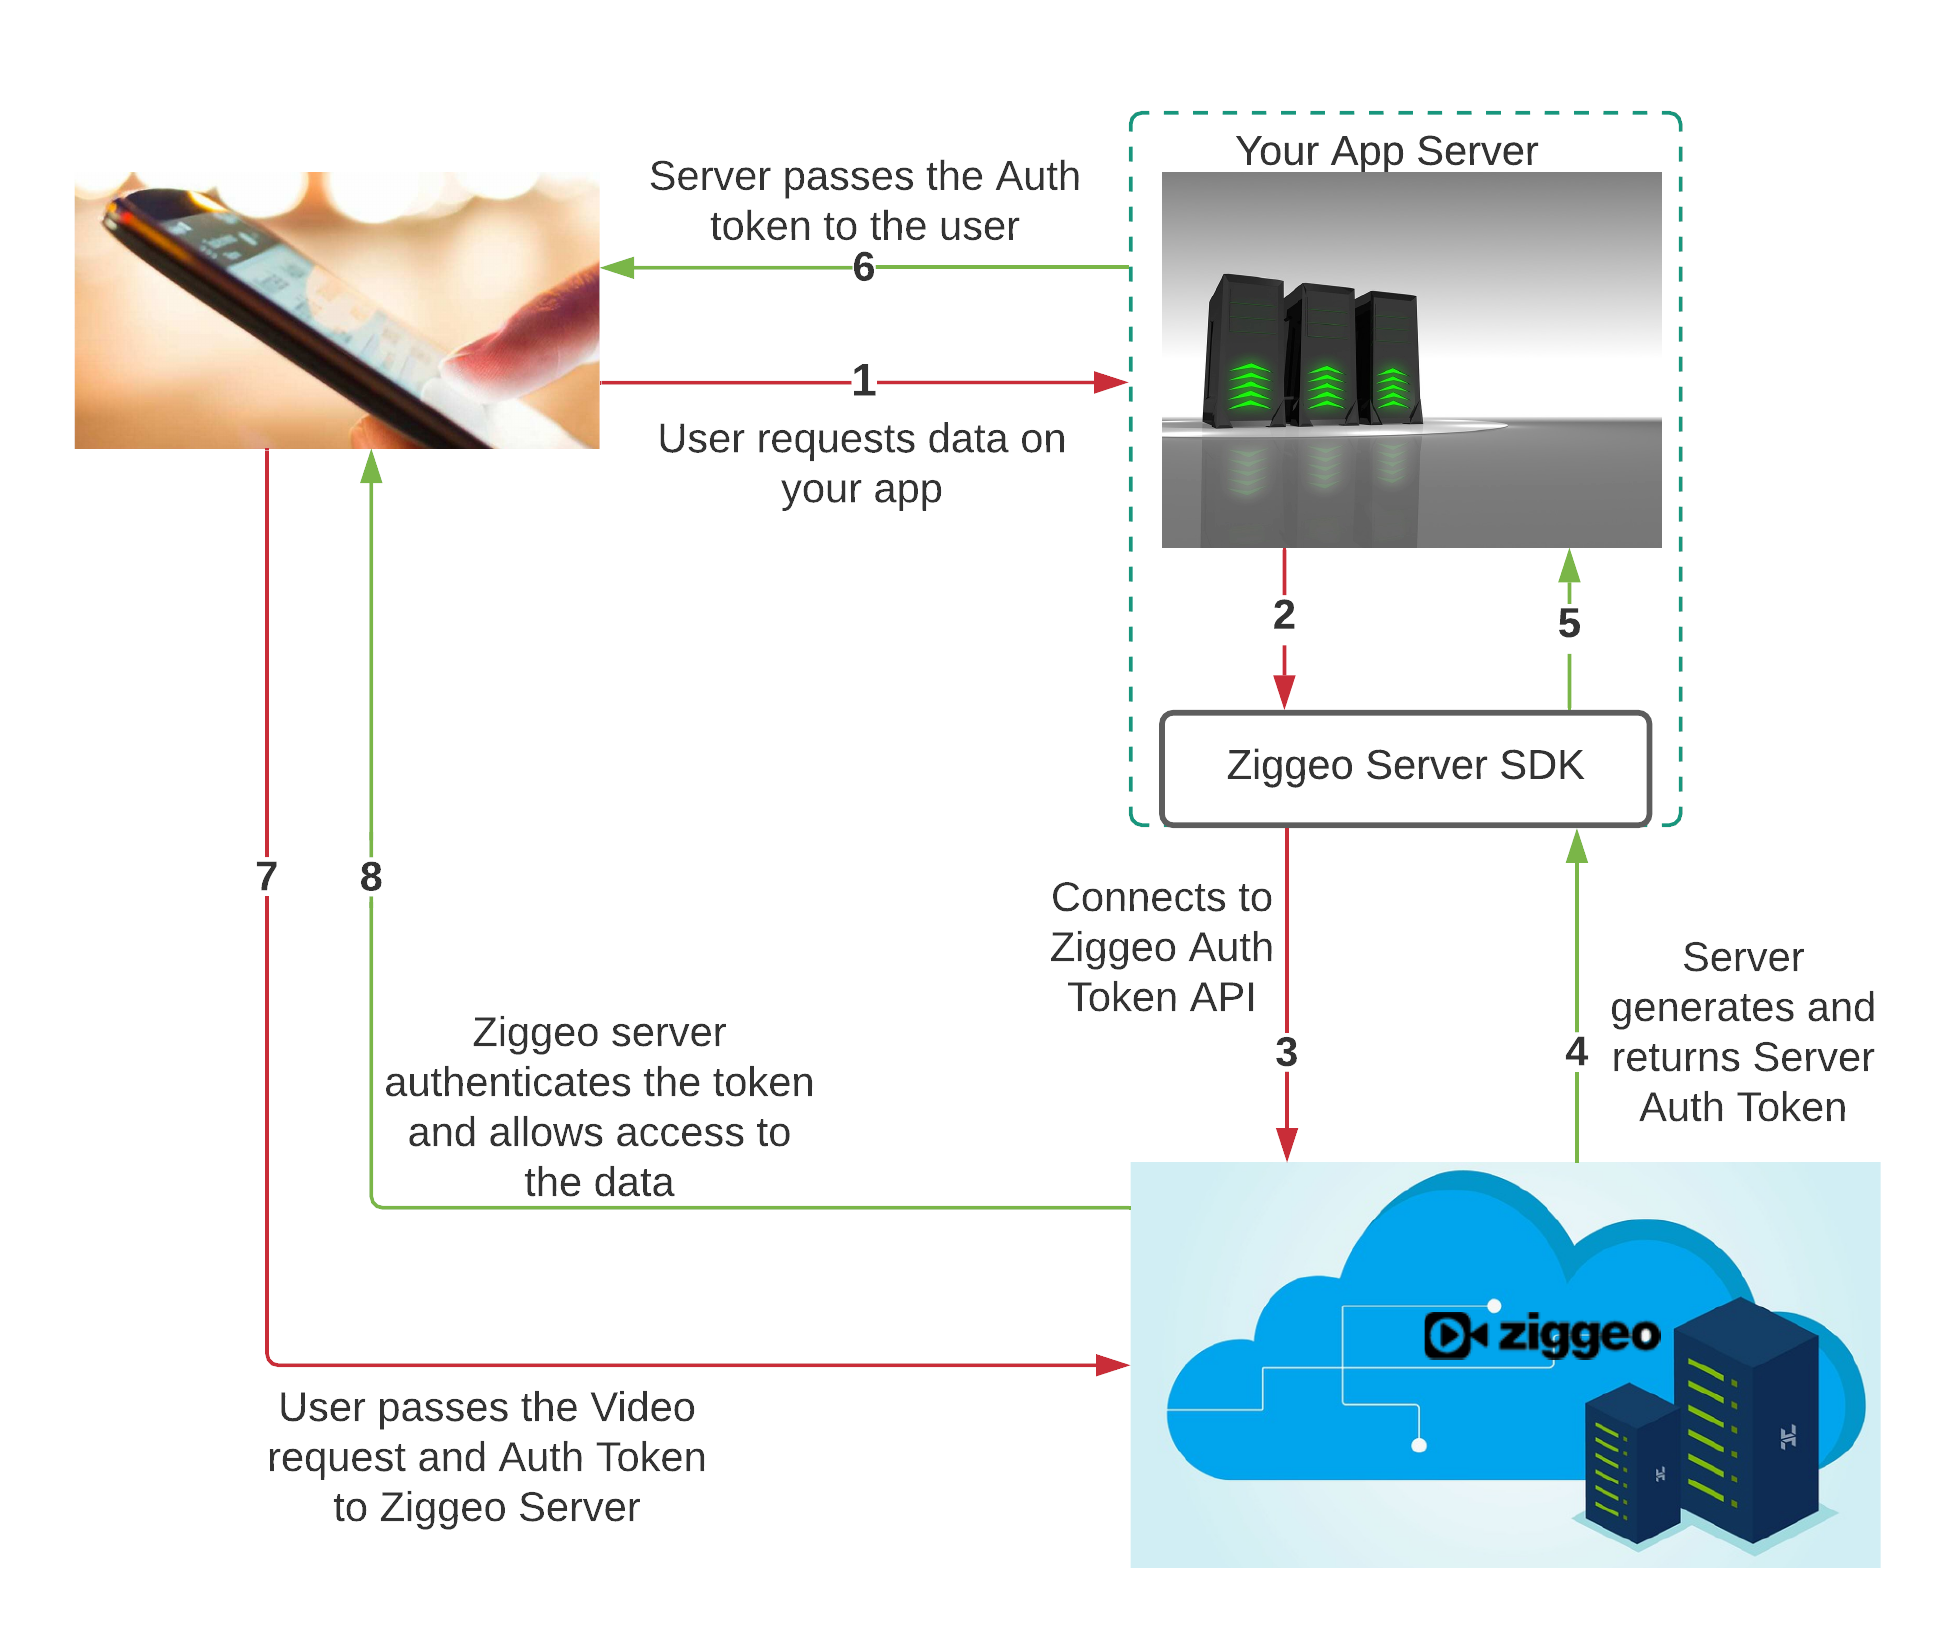
You can create server side SDK through your Dashboard. Both server side and client side can however be created using our server side SDKs. Using our SDK, your server will create a unique cryptographic token. This token can be created even without interaction with our servers.
- Passing the Auth Tokens to our server for verification.
After creating the token, it needs to be passed to our server through the recorder/player embedding using the server_auth or client_auth parameter. That's it.
Server side tokens
The way server side tokens work is by having the tokens created on our side. Each token is saved with all of the options that you specify.
For example if the token is associated with a video token, how long it should be active, how many sessions, and alike.
Depending on the server side language you use, the way you would make a call it could be a bit different. Still it would work just the same.
This happens in the back, through communication between your server and our servers. It is then up to you to pass the received auth token to the player or recorder.
As the auth tokens can be created, they can be removed in the very same manner. Once created, the auth token will give you needed permissions. Once removed, the same permissions will not longer be present. What that means, is that if someone passes the token that you have removed, it will be seen as if token was not passed at all.
How to start
Starting to use is very simple. You can grab any of our demos and just modify it to be called from your code.
For example if you are using PHP you can check out our demos for creation and removal of auth tokens.
That is it really, you are all set.
Client Side tokens
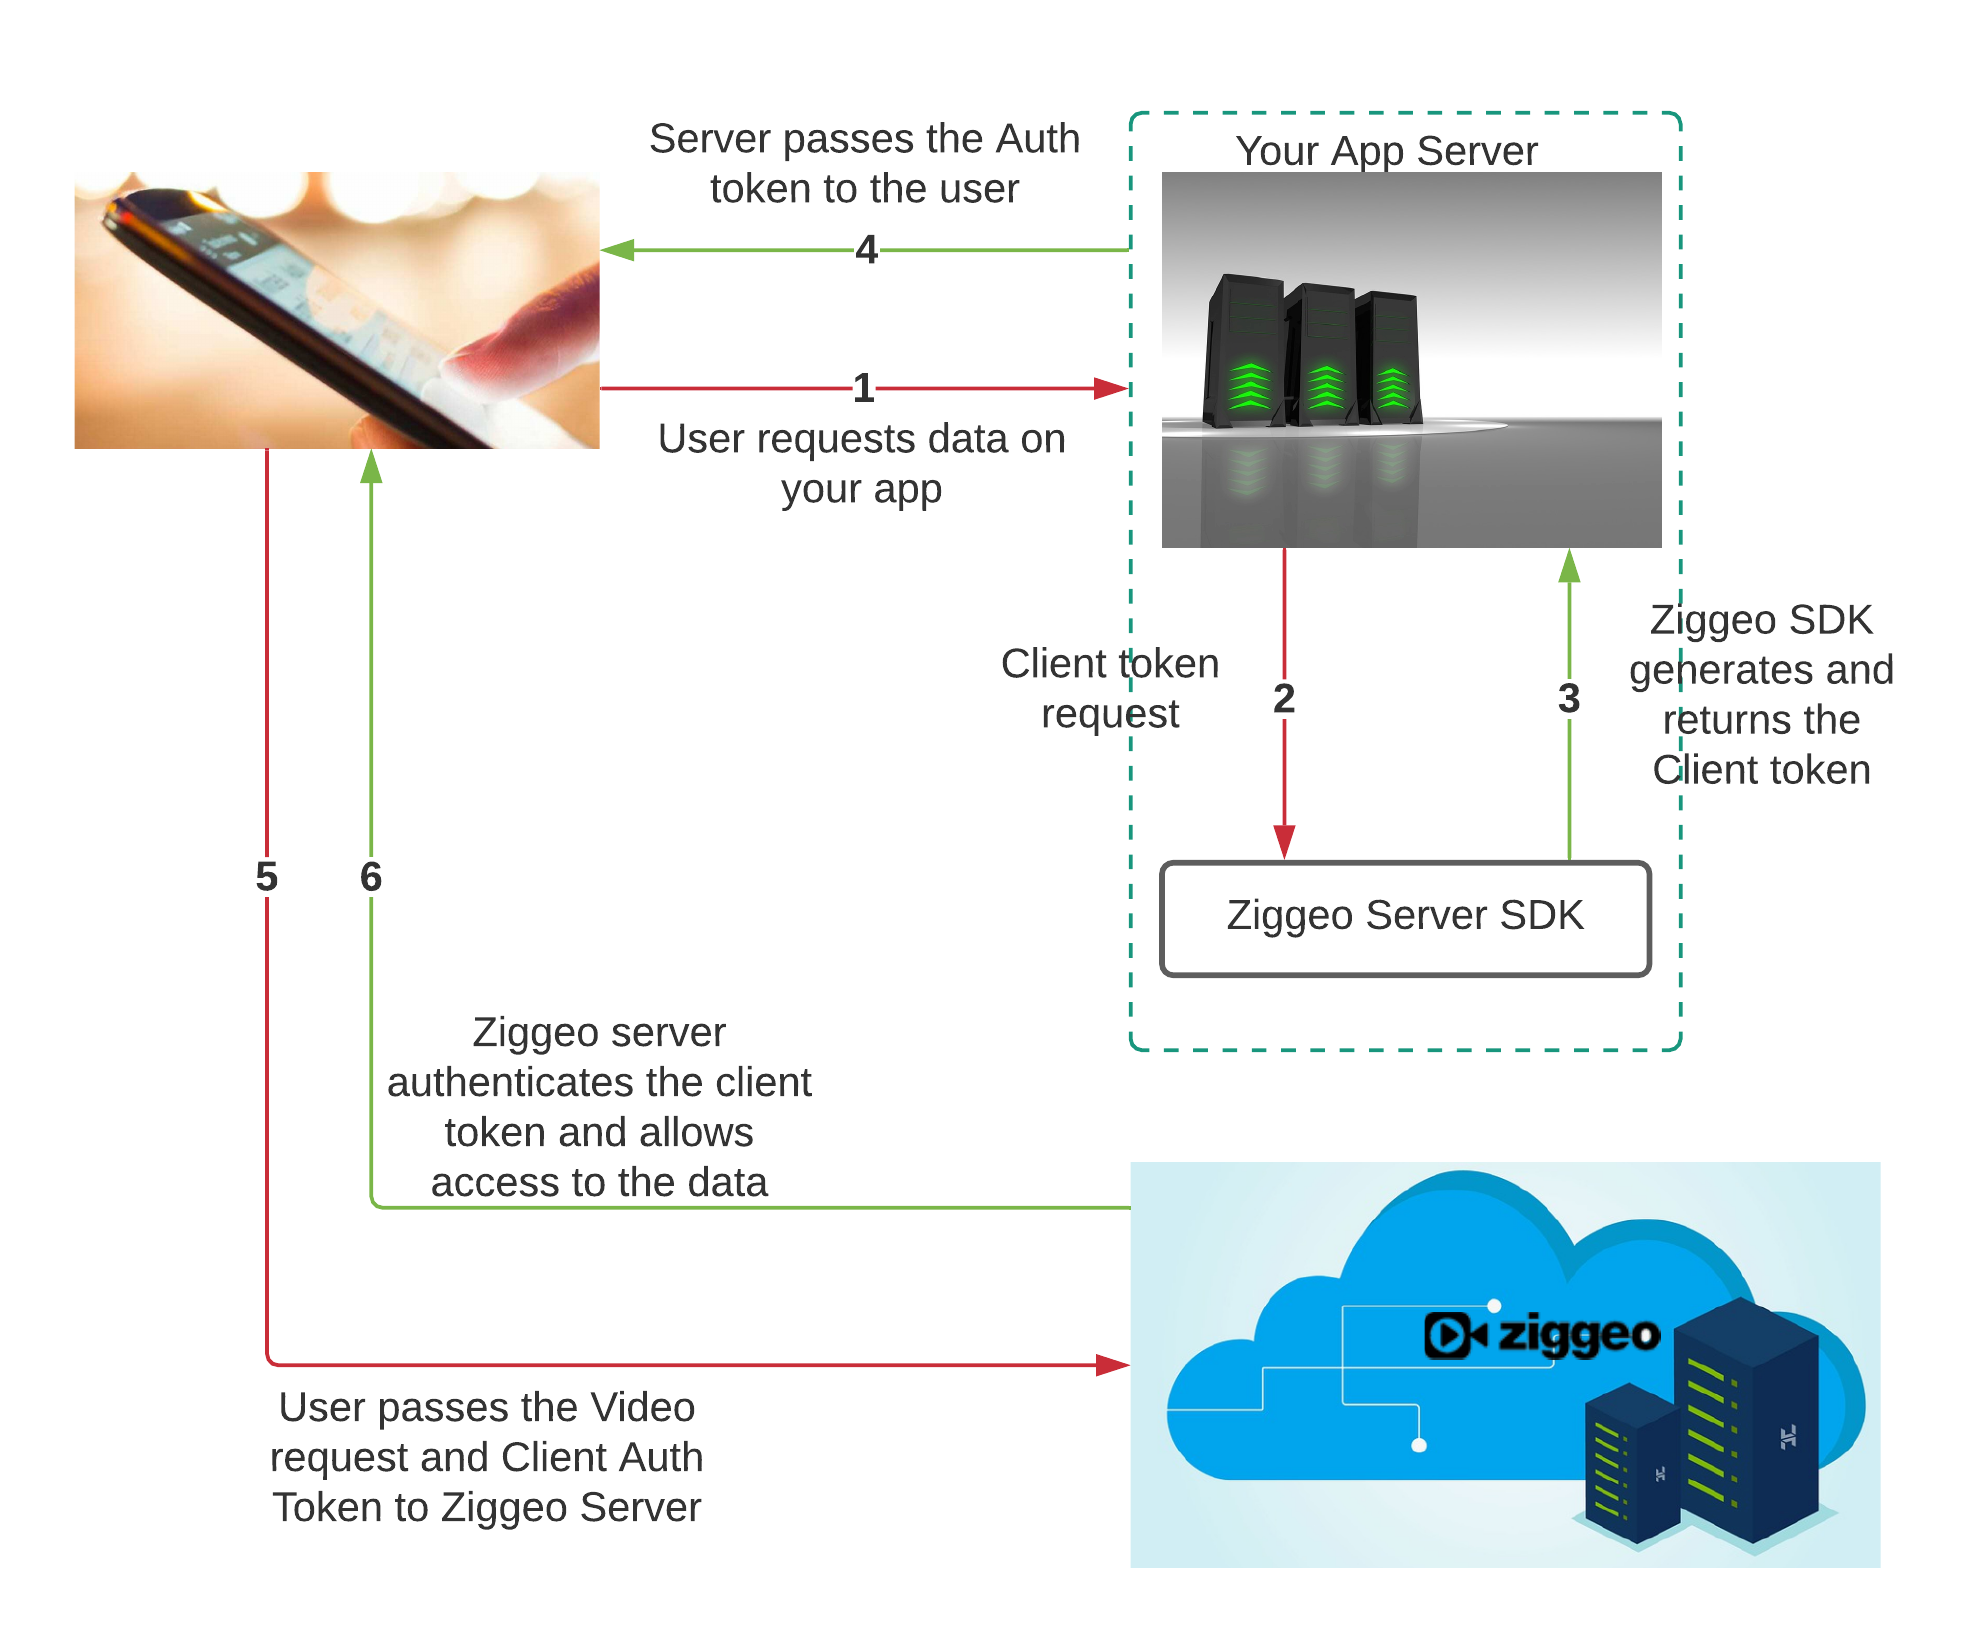
The difference between server side and client side tokens is in the way they are created. All of the tokens are made on your server side. Once they are made, our servers do not really know anything about them. It is only when you make a call to our service that we will know of them.
This makes these tokens great if you have many requests and want to provide the tokens quickly.
While these tokens are passed through the page where your customers could see, these are still something they can not edit. The way they are made is to use the settings and then encrypt the same. Our servers are the only ones knowing the keys you have encrypted the data with and can decrypt them back.
So even if they see the code, they will not really be able to modify or use it for anything other than what you have set up.
Setting it up is just as simple as the server side tokens. You can see a demo of it here.
Advanced Auth token system setups
Some of our customers have added our auth tokens in a way that can be seen as complex. It can also be added in a very simple manner. In this section we will tell you one of the more complex ways our auth tokens are used.
Imagine if you open a webpage with a video player. You are already logged into a system and the server can see that you have permission to see the video.
In that moment, the server creates the auth token (client side) and outputs the player code with that auth token. The auth token is set up to only allow playback. It is also set up to only allow playback for that specific video. As soon as the player loads, it passes the auth token to be able to get the image and show it as a preview for you.
Every person that goes to that page gets their own auth token. Not only are they set up for specific video and only to allow playback, they are also time limited.
Pretty great thing is that there are many different parameters that you can use. Each gives you a different way to uniquely set up your auth tokens. You can see all of them here.
When should I add auth tokens
When you think of security your first thoughts are likely to turn it on right away. From experience, we would suggest something else - do it at the end.
If you are going to be playing around with different settings and fine tuning the setup, you might want to do that first. Once you have things set up the way you like it, you can easily just add auth tokens on top of it.
If done at start it could add confusion. You will not have any way of knowing if your auth tokens or your setup is not set up right. After all the goal of auth tokens are to stop the requests if they do not look right.
Final thoughts
For more details, please refer to the in-depth documentation available here. You can also refer to our Authorization Tokens sandbox here. This is the fastest and easiest way to create simple authorization tokens and give yourself a jump-start on authorization setup.
Feel free to write us as support@ziggeo.com for any details.