Wordpress Templates Editor
See how to create and manage your templates in Templates Editor
Templates Editor Page
Templates Editor page offers you everything you need to create, edit and manage your templates.
It features the templates list, short explanation of filed types, as well as the editor itself.
The template types can be extended by your own codes, so that template type offers you more than what is available originally. Videowalls plugin is a good reference point to see how that can be easily done.
How templates work
Templates are designed to offer you a way to create / set up your code in one place and the use it in as many places as you need.
This way you have a single place where you would update your embedding.
For example, lets imagine that you have one specific recorder setup that you want to use on multiple pages. Regardless if you are using the templates or direct code, you will need to add these codes into each of those pages.
The benefit presents itself if you decide to make an update to your recorder. With direct codes you need to edit all 10 of those pages. With the template, you only need to change the template in template editor. Any place where you used the template with the template name, will immediately start loading the latest changes you made.
So benefit is that you only need to update a single place when you use templates.
If you use a template and the template gets removed at some point, depending on the template type different things can happen. By default our plugin will have several different fallbacks.
If the template can not be found at all and you use [ziggeotemplate ID], instead of trying to figure out what you wanted to do (pre 3.0) a special hidden information will be placed instead of the recorder. Your own customers will not be able to see it, however you or our support team can immediately see this hidden information.
The benefit and reason why this is recommended way of implementation is because you can update your template ID with anything from template base or the parameters. It also means that if it fails to be found you will be able to see the notification about this and that only what you expect to see there will be shown.
If you use a template base approach then there would be several different fallbacks that would kick in if the template ID can not be found. For example [ziggeorecorder ID] would still show a fallback recorder.
The benefit of using this approach is that even if you delete the template ID, the plugin will still try to use several different fallbacks for the video recorder. For example there is comments default for recorder, the integration or just general default. Depending on where the recorder is used, one of those will be used.
When to use templates and when to use codes?
Both codes and templates will work fine for you. Benefit of using custom code on your pages is that you can always fine tune your JavaScript and HTML codes to perfectly match everything you want.
The downside comes if you are using the editor in your WordPress website that changes the codes, not allowing you to add HTML, JavaScript or neither to the pages.
In such cases templates will work as they are designed to look like WordPress shortcodes.
Benefit of templates in your WordPress website is also that you can easily set it all up even if you do not know any code.
Another and most important benefit of using the templates is that you can create and update the template in one page - the templates editor - even if you have the same used on hundreds of other pages. By using the code approach, you would need to make update to every page where the recorder you want to update can be found.
Creating template
To create a template you would need to open the Templates Editor page found under the Ziggeo menu in your WordPress dashboard.
Once you do you will quickly see the editor fields.
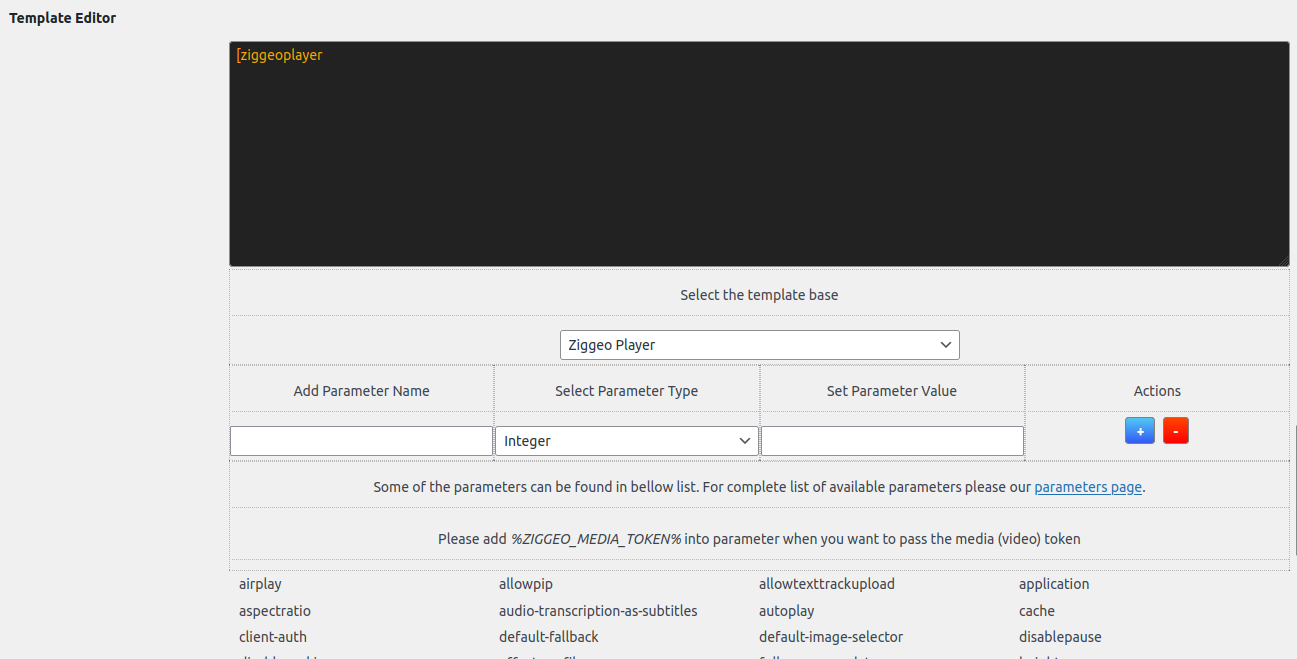
The Template ID field is the ID / name of your template. It will allow you to have a reference to the template to be used. This way any time your code is being used with this ID, it will load the very latest version of the same.
This is a unique name for your template and we do suggest using something that will allow you to quickly tell templates apart.
Template Editor is the next section and can look differently depending on the template base. So the first option is to select the base from the available ones in the dropdown and then to use the autocomplete fields bellow to add, edit or remove the parameters.
The autocomplete feature will assist in adding your parameters however you can add any parameter that you want, even if it is not found in the list. This way you can add something that might be shown on our parameters page even before it is added to WordPress.
Once you are happy with what you prepared, you can click on Save Template button and that is it.
- At this point you have created your own template that you can immediately use.
How to manage your templates
Updates and changes are part of everything. Our templates allow you to easily make the changes and updates when you need them.
To do this you would go to your Templates Editor in the plugin settings and at the very top you will see the list of all templates you have created.
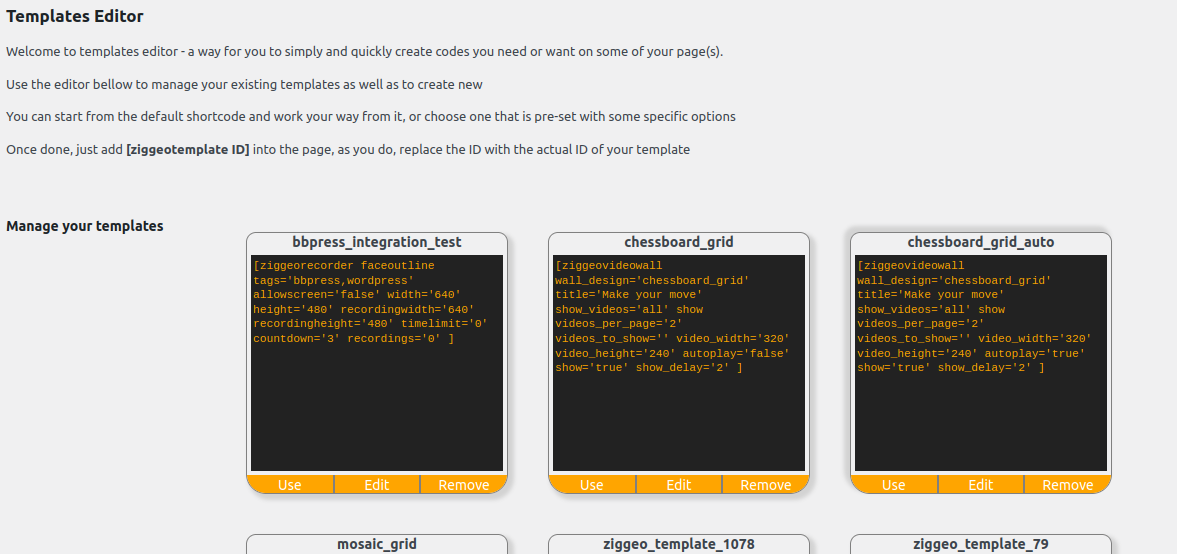
What you will see are many different boxes, each representing your template.
They are designed in such a way that from the top as you check it out you can immediately see the template ID / template name. Right under it you can now see the shortcode that the template is created of.
Bellow this section there are 3 buttons: "Use", "Edit" and "Remove".
The Use button will show you the recommended way to add that template onto your page, post or any custom post type in your WordPress website.
The Edit option will load up the values from the template into the editor bellow and prepare the template for you to modify it as needed. You can modify the ID itself. Please note that if it is already in use, this will not update the pages where the template is found, only the template information itself.
It will also allow you to modify the template parameters.
Removing will ask you to confirm and then remove the template for you. This is permanent action so best used only when you are sure you want to remove it and you know that there are no pages using it.
Note: When editing the template ID or removing the template completely and if you are using the recommended shortcode, you will see a notice in the Notifications panel under your Ziggeo menu with exact page where the template ID was not found. This way you can be sure to know afterwards if something is not working as expected without you needing to hunt it down across your website. It will however require that the page where the issue is found is opened at least once for this error notification to be created.
How to add Custom Template
There are times when you might want to create your own template. This would allow you to easily create and modify the templates and create the code that is re-used any time your template is in use. If you will, imagine it not as being a template, rather as a reusable construction block that you get to just easily recall any time you need.
One good example of this is our Videowalls plugin. What we did there was:
- Registering our new template base
- Adding options that can be used
- Listening in the back when it is time to parse the same
Using same approach you can add your own template.
There is an action called: ziggeo_add_to_ziggeowp_object. It is used to add custom code into the ZiggeoWP object that is available in the JavaScript. Generally you should create your own object for your own codes, however if you need to add or modify something that is set by one of our plugins, you can do so in this object. To make modifications you would not use this action, this is just to output code into the header.
The very first thing you would want to do is to use the ziggeo_setting_available_templates filter. It will allow you to add your own template base.
For videowall we use this code:
add_filter('ziggeo_setting_available_templates', function($templates) {
  //lets add videowall template..
  $templates[] = array(
            'value' => '[ziggeovideowall',
            'string' => _x('Ziggeo VideoWall', 'videowalls-for-ziggeo')
  );

  return $templates;
});
- Please remember that for filters you listen to, even if you are not changing anything you always need to return the original information or you will clear out all of the values that are in there.
The above code will result in the [ziggeovideowall base being available in the templates editor base selector. It will not result in any processing, it will just show or hide it in the dropdown. The value is going to set the internal value for the base while the string will be used to create the text that is shown in the dropdown.
Next, you should listen to the ziggeo_manage_template_options_pre filter. Unlike above, this one will not show up anywhere, however it will tell our parser script that the template belongs to your code and what function should use it.
add_action('ziggeo_manage_template_options_pre', function($existing_templates) {
  $existing_templates[] = array(
                'name'      => 'ziggeovideowall',
                'func_pre'    => 'videowallsz_prep_parameters_videowall',
                'func_final'  => 'videowallsz_content_parse_videowall'
  );

  return $existing_templates;
});
Now in this call we have 3 important parts. The name is just a name of the template we are setting up. It should be similar to the "value" we have made in the dropdown, just without the "[" (opening square bracket).
Following it is func_pre, which should be the string of the actual function in your own code that should be used to pre-process your parameter. For example if you want to make modifications to them or add any prefix, escape them, etc.
func_final is then called in the end, and will be used to build the HTML and/or JavaScript code of your template. In the case of Videowalls plugin, this function is called to prepare the output for the creation of the videowall.
Now if your template would be used as standard [shortcode ], then you would need to also hook into ziggeo_content_filter_supported_codes_single filter. If it has a closing shortcode, like so: [shortcode]token[/shortcode] then you should hook into ziggeo_content_filter_supported_codes_double.
Both are equally simple to set and it would look like so:
add_filter('ziggeo_content_filter_supported_codes_single', function($supported) {
  $supported[] = 'ziggeovideowall';
  return $supported;
});
This allows our parser to properly search for the same and find it, after which it would call your functions above.
Now the last part is to just add parameters into the editor auto-complete field. To do that, we would listen to one more hook: ziggeo_template_parameters_list
add_filter('ziggeo_template_parameters_list', function($parameters_list) {

  $wall_parameters = array(
    'fixed_width' => array(
      'type'                  => 'integer',
      'description'           => _x('Integer value representing fixed width of the video wall', 'videowalls-for-ziggeo'),
      'used_by_player'        => false,
      'used_by_recorder'      => false,
      'used_by_rerecorder'    => false,
      'used_by_uploader'      => false,
      'custom_used_by'        => 'ziggeovideowall',
      'advanced'              => true,
      'simple'                => false,
      'default_value'         => ''
    )
  );

  $parameters_list['wall'] = $wall_parameters;

  return $parameters_list;
});
Notice that the $wall_parameters is an array. It can have one or more parameters in there, depending on your preference. Another important thing is that $parameters_list is going to be filled out with all parameters collected to the point when it reaches your code, so you should at least return it as is, or modify as needed.
Since in our case we wanted to add Videowall parameters as new parameters along side of the core parameters we wanted to have them on their own, hence adding it as $parameters_list['wall'].
If you wanted to update or add additional option into the existing parameters you would find them under $parameters_list['system']. A good example of doing this can be found in our core plugin within the hooks-examples.php file is when we added the field called wpzc_title_from_filename. It allowed us to add the option to set the title from the file name just by adding this parameter into the recorder template.
If you look at the above code example, you can notice that we set the type of the parameter. It can be "integer", "string", "float", "boolean", array, "json". used_by parameters can help set if the parameter is going to be used with the player, recorder, rerecorder or uploader. This is generally useful for the core plugins or options that hook into those, while for custom ones you would most likely want to use custom_used_by instead.
"advanced" and "simple" are at this time just placeholders for older version support which are no longer used, while the default_value is a way for you to set the value that should be used by default if none are set for the parameter and it is set in the template.
This will help you with everything needed to have and parse your template.